
Objective:
Creating Custom Field Optimization Component with a Custom Graph Unit Cell
Applies to:
- Field Optimization
Procedure:
This article uses nTop Automate, Topology Optimization, and Field Optimization. Here is a list of resources that are suggested pre-requisite before going through the article.
- nTop Automate Learning Center course
- Topology Optimization Learning Center course
- “How To Run a Field Optimization” support article
Before we begin going through the article, we recommend you download the files that are needed to follow along from here. We recommend you create a new folder, as we will create multiple files and run scripts. We should place all the files and scripts in the same folder.
Table of Contents
1. Generate Custom Unit Cell
2. Gathering Homogenization Data
3. Creating Parametric FE Component
3.1. Updating the Material Model
3.2. Updating the Porosity Function
3.3. Updating the Geometry Function
3.4. Updating the Parametric Lattice Component
4. How to Use Custom Parametric Lattice Component
1. Generate Custom Unit Cell
We will start by generating a custom unit cell to be used as part of your field optimization workflow.
Note: This Support article covers graph unit cells only.
1. Following the support article, you can generate your Custom Graph Unit Cell. For this example, you can download the “custom_graph_unit_cell.ntop” file as a starter file and change the Line Segments and Domain input if you wish to change. We need to ensure that the unit cell is periodic.
2. Save and close the file.
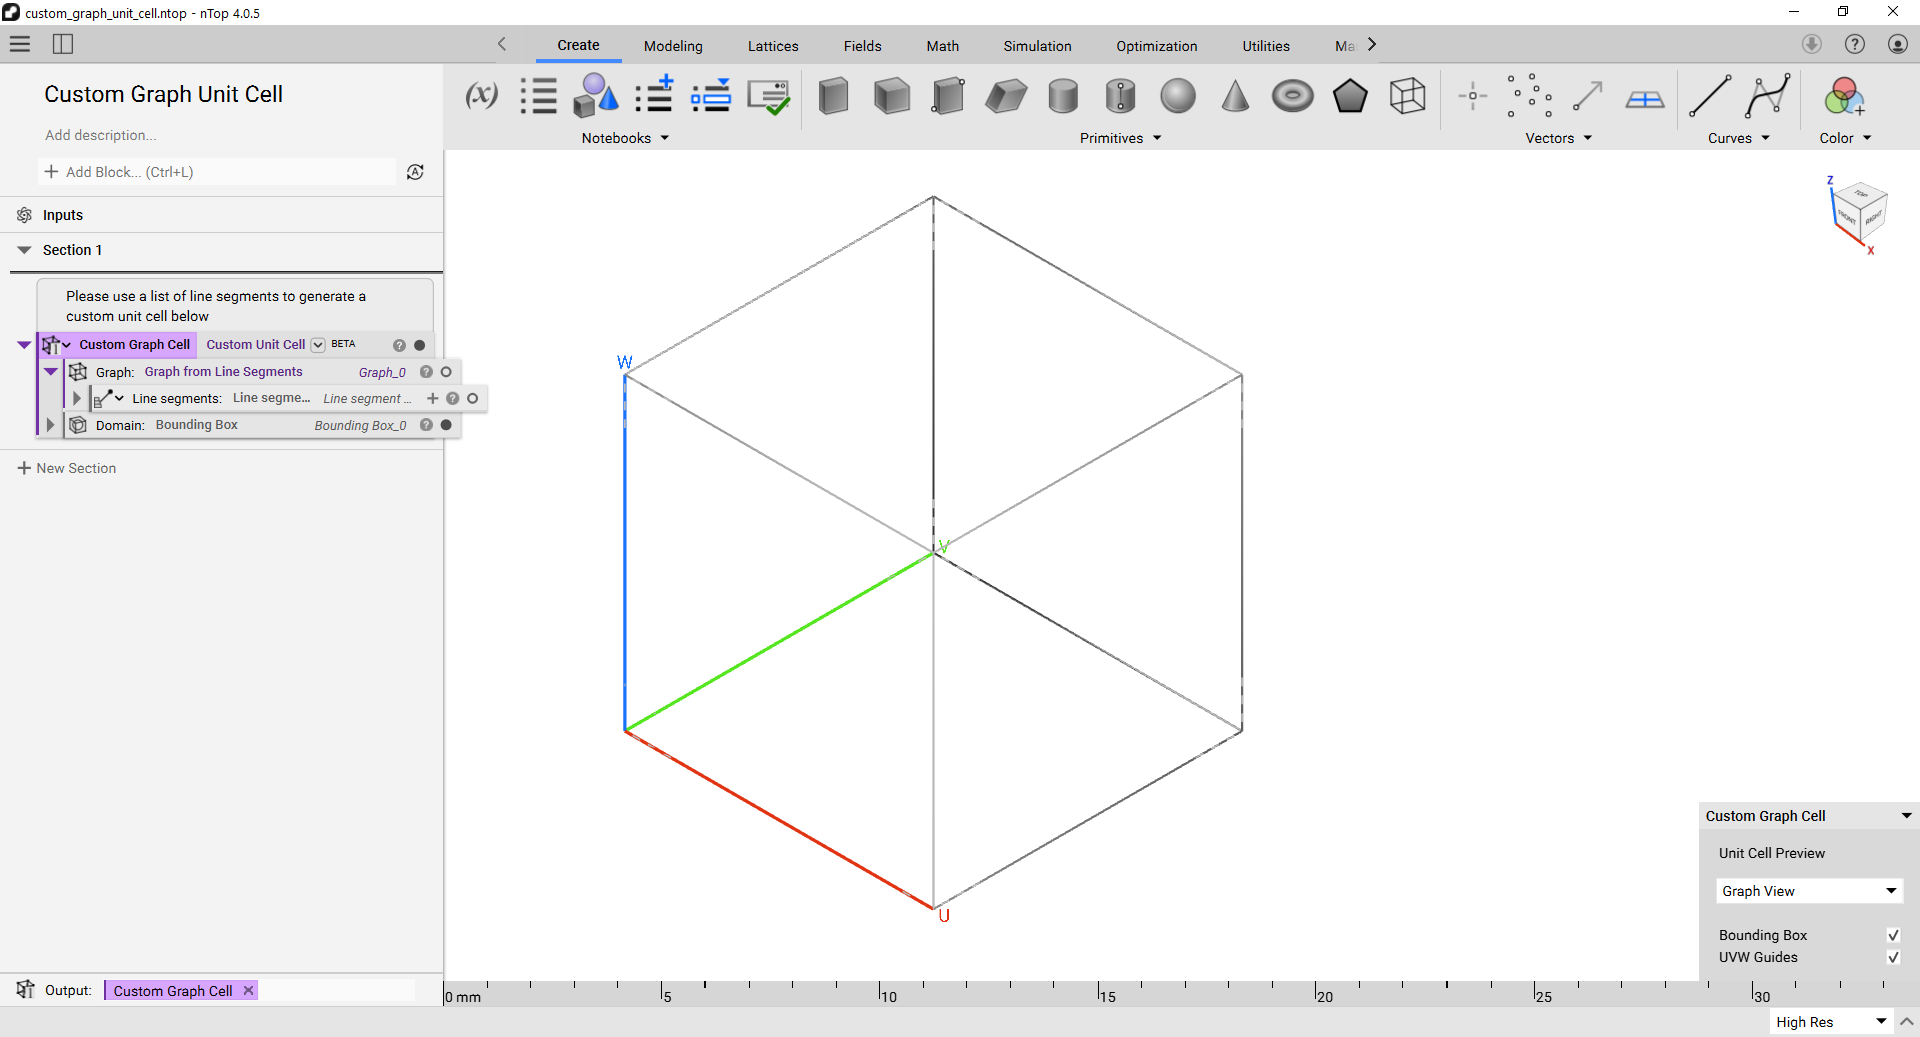
2. Gathering Homogenization Data
In this section, you will be using nTop Automate to run a series of homogenization. The homogenization data will be used in the field optimization process. For more information, see Field Optimization FAQ
1. Open "homogenize_periodic_lattice.ntop" from the downloaded files.
2. Import the custom unit cell ("custom_unit_cell.ntop") generated in the previous step.
- Click the Show Left Bar icon on the Top-Left corner next to the Hamburger icon.
- Switch to the Imports tab, then click the Import Block.
- Select the "custom_unit_cell.ntop" from the File Explorer.
3. Drag and drop the unit cell into the unit cell variable
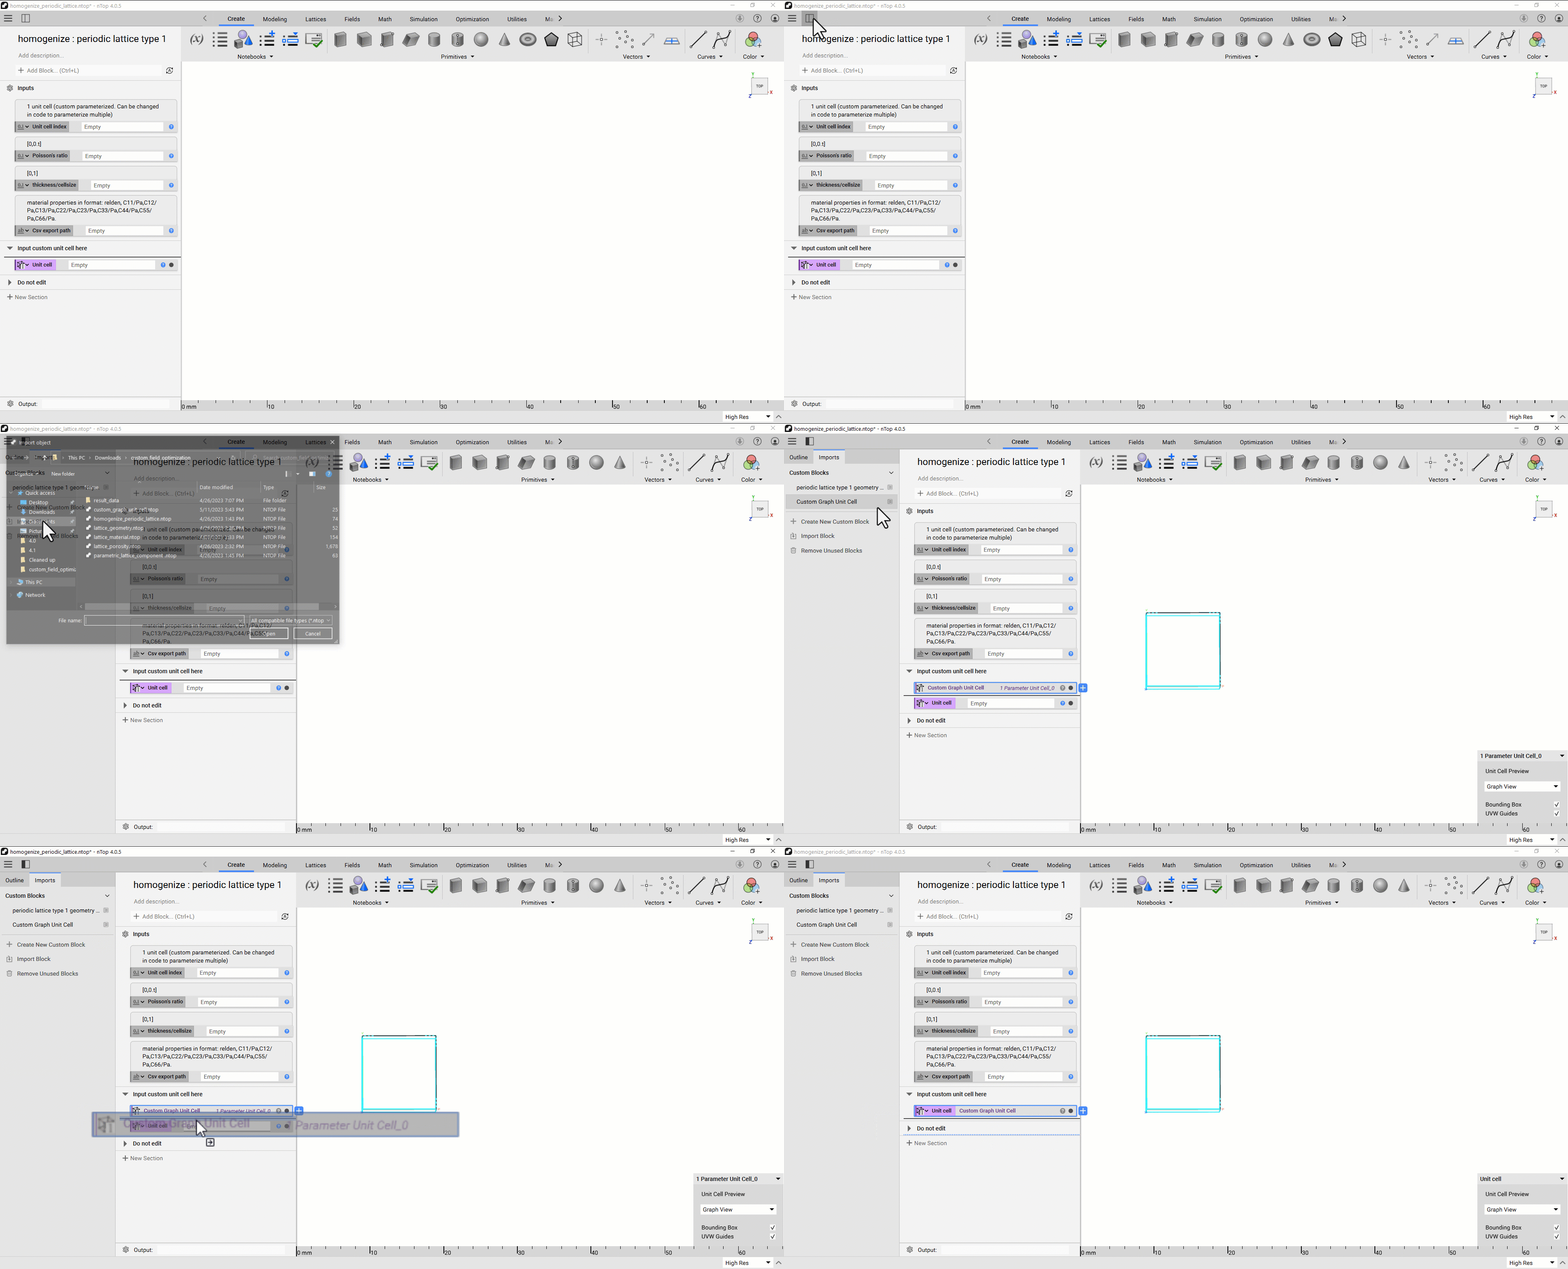
4. Save and close the file.
5. Open "run_data_collection.py" in a Python IDE. We recommend downloading one of the following free software:
- Thonny (recommended for beginners)
- Spyder
- Visual Studio Code
Examples in this article are done using Visual Studio Code
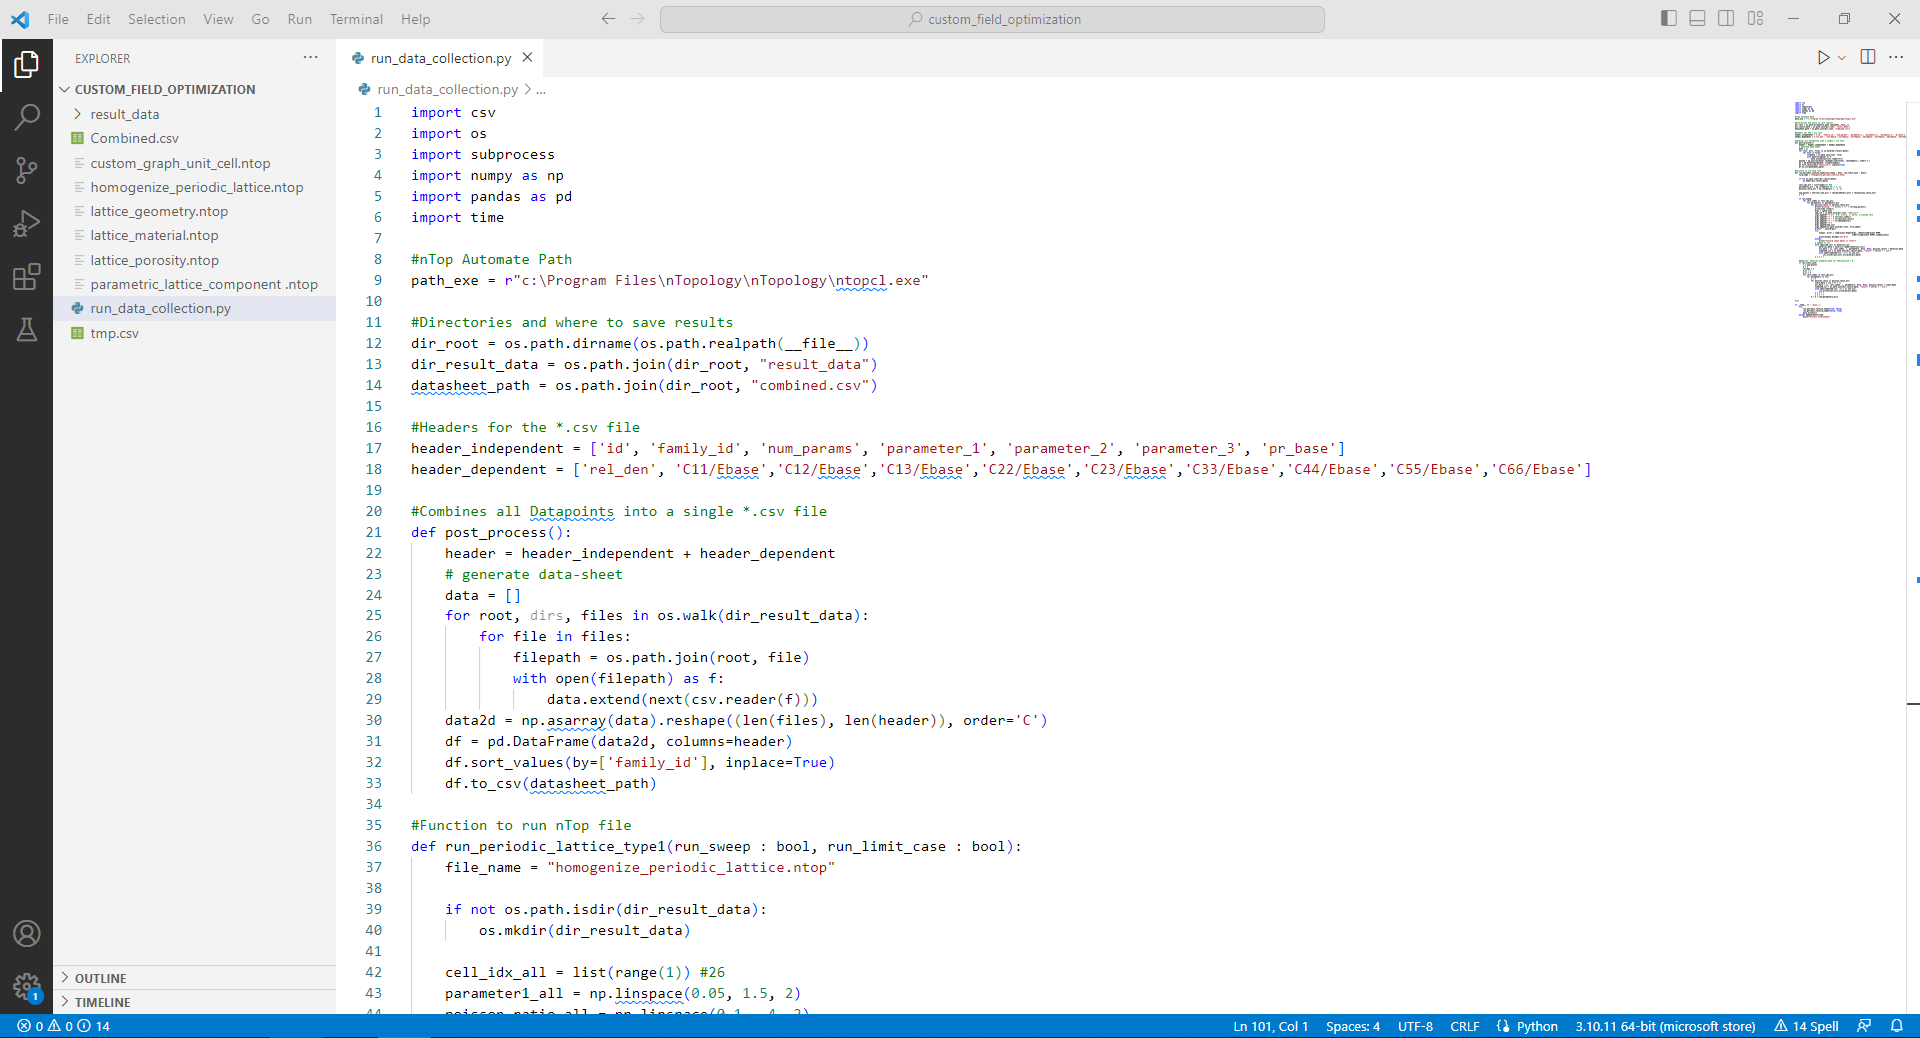
Note: Ensure the file "homogenize_periodic_lattice.ntop" is in the same directory as "run_data_collection.py."
7. Enter the number of discretizations over the Poisson ratio and thickness you would like and run the Python script. The lines of code to adjust are annotated below:
Lines 43 and 44 in the provided code replace the bounds and number of discretizations for the parameter sweep. The variables corresponding to the values are listed below:
Note: The minimum number of discretizations for thickness should be at least five but ideally greater than 10.
Parameter1_all = np.linspace(min thickness/cell size, max thickness/cell size, number of steps)
Poisson_ratio_all = np.linspace(min poisson ratio, max poisson ratio, number of steps)
Note: The Poisson ratios should include that of your intended printing material. Example code is seen below:
    parameter1_all = np.linspace(0.05, 1.5, 2)
    poisson_ratio_all = np.linspace(0.1, .4, 2)
8. After running the Python script, a “combined.csv” file with values should be available in the file directory where the Python program was run.
Warning: The combined.csv, as well as the individual *.csv files in the "Result_Data" folder, must be deleted before running the script with different settings or for a different unit cell to prevent it from appending.
3. Creating Component
In this section, we will create the custom lattice component to be used as a Parametric FE Component block in field optimization workflows.
3.1. Updating the Material Model
- Open “lattice_material.nTop” from the downloaded files.
- Import the “combined.csv” using the Import Table block generated in the previous section and drag it into the “data sheet” variable. Note: do not unselect the “header” option. A warning will appear; that is due to the header, and it is okay to ignore it.
- Save and close the file (“lattice_material.ntop”).
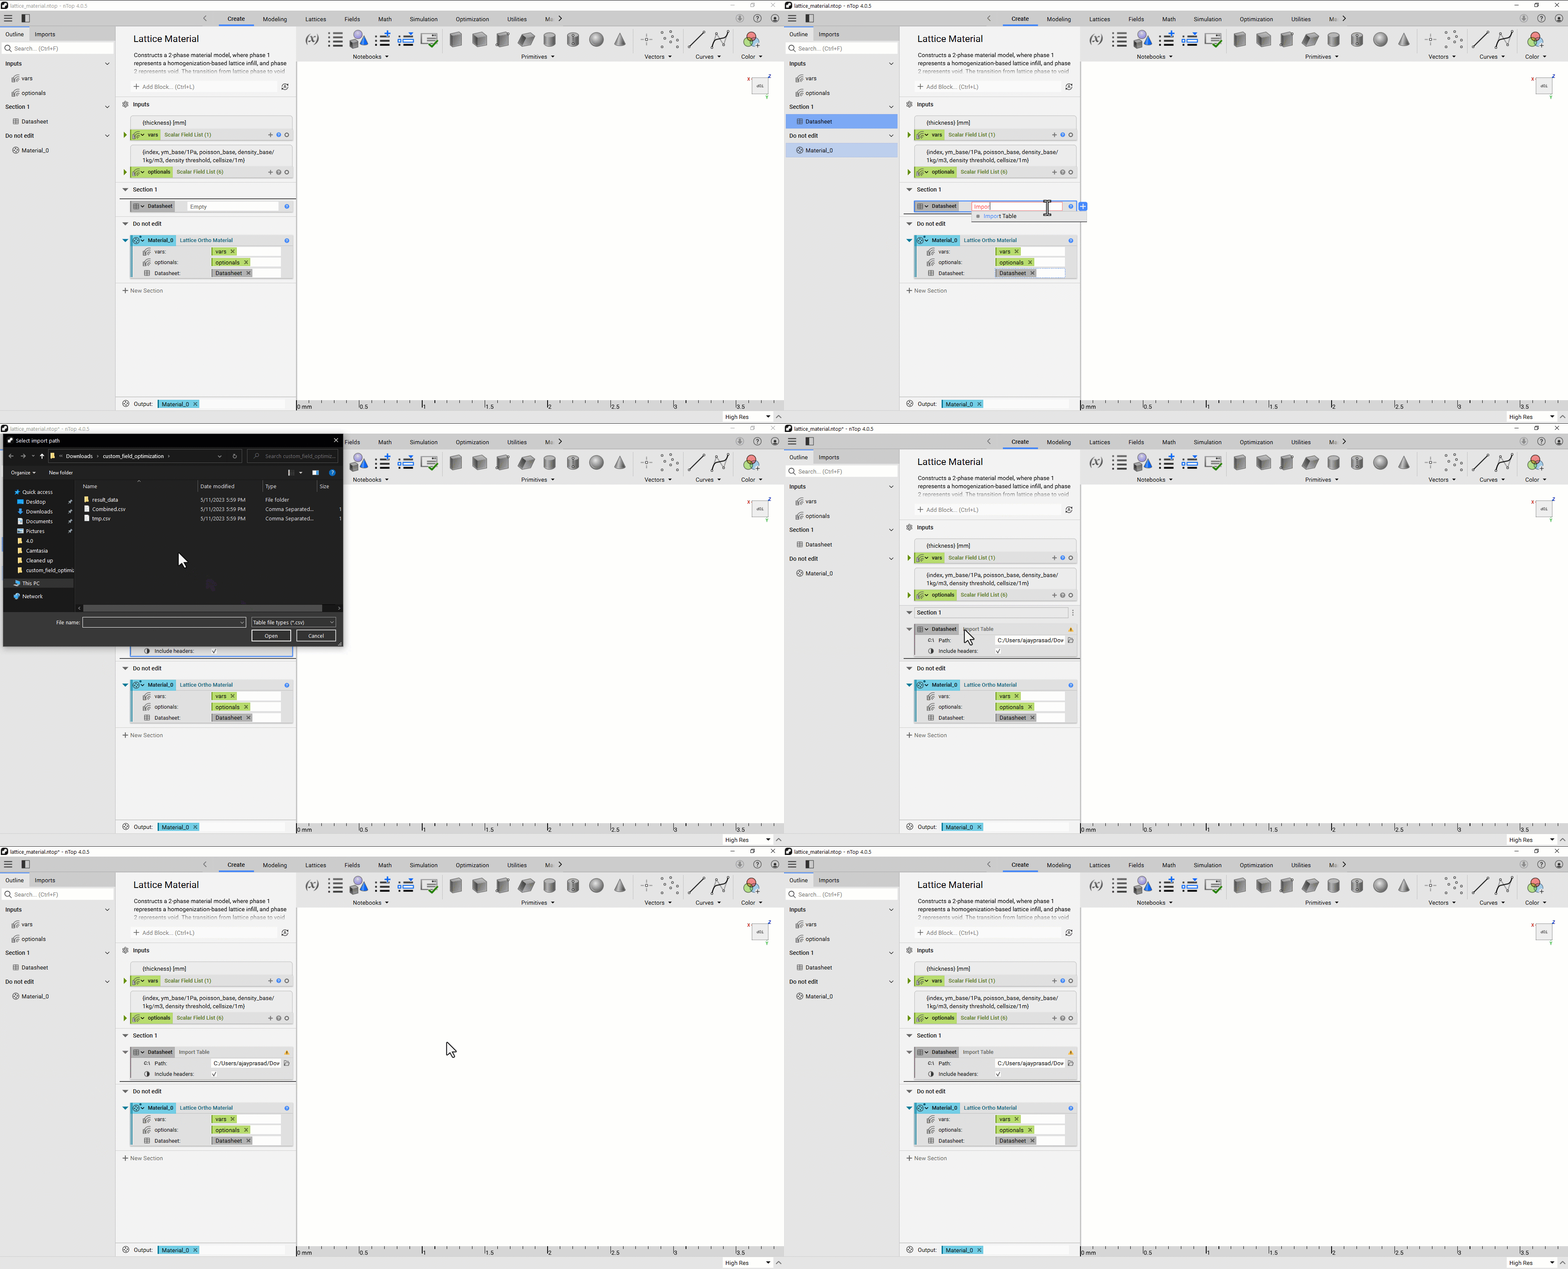
3.2. Updating the Porosity Function
- Open “lattice_porosity.nTop” from the downloaded files
- Import the “combined.csv” using the Import Table block generated in the previous section and drag it into the “data sheet” variable. Note: do not unselect the “header” option. A warning will appear; that is due to the header, and it is okay to ignore it.
- Save and close the file (“lattice_material.ntop”).
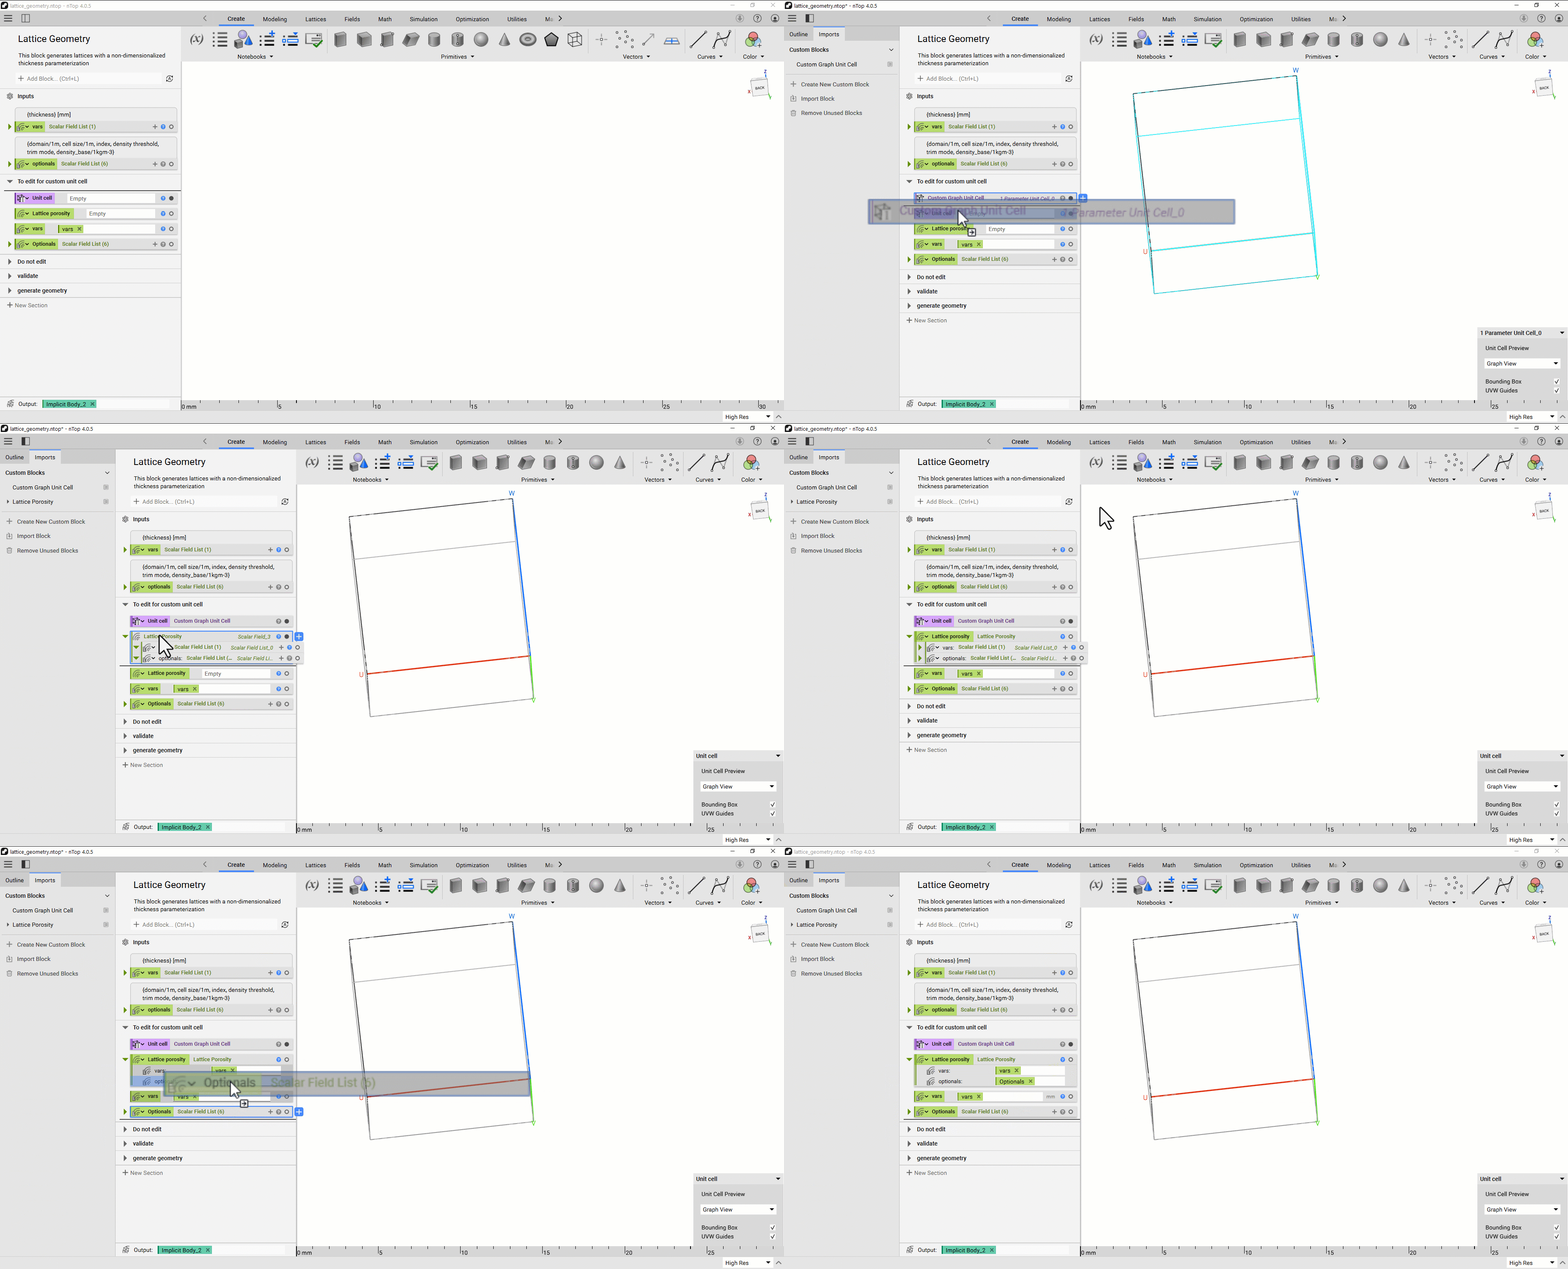
3.3. Updating the Geometry Function
- Open “lattice_geometry.ntop” from the downloaded files.
- Click the Show Left Bar icon on the Top-Right corner next to the Hamburger icon.
- Switch to the Imports tab, then click the Import Block.
- Select the "custom_unit_cell.ntop" from the File Explorer.
- Drag and drop the unit cell into the unit cell variable
- Import “lattice_porosity.ntop” from the previous section and drag it into the “Lattice porosity” variable
- Delete default inputs from the imported “Lattice Porosity” block and drag “vars” and “Optionals” variables into respective inputs.
- Save this file as “lattice_geometry.ntop”
3.4. Updating the Parametric Lattice Component
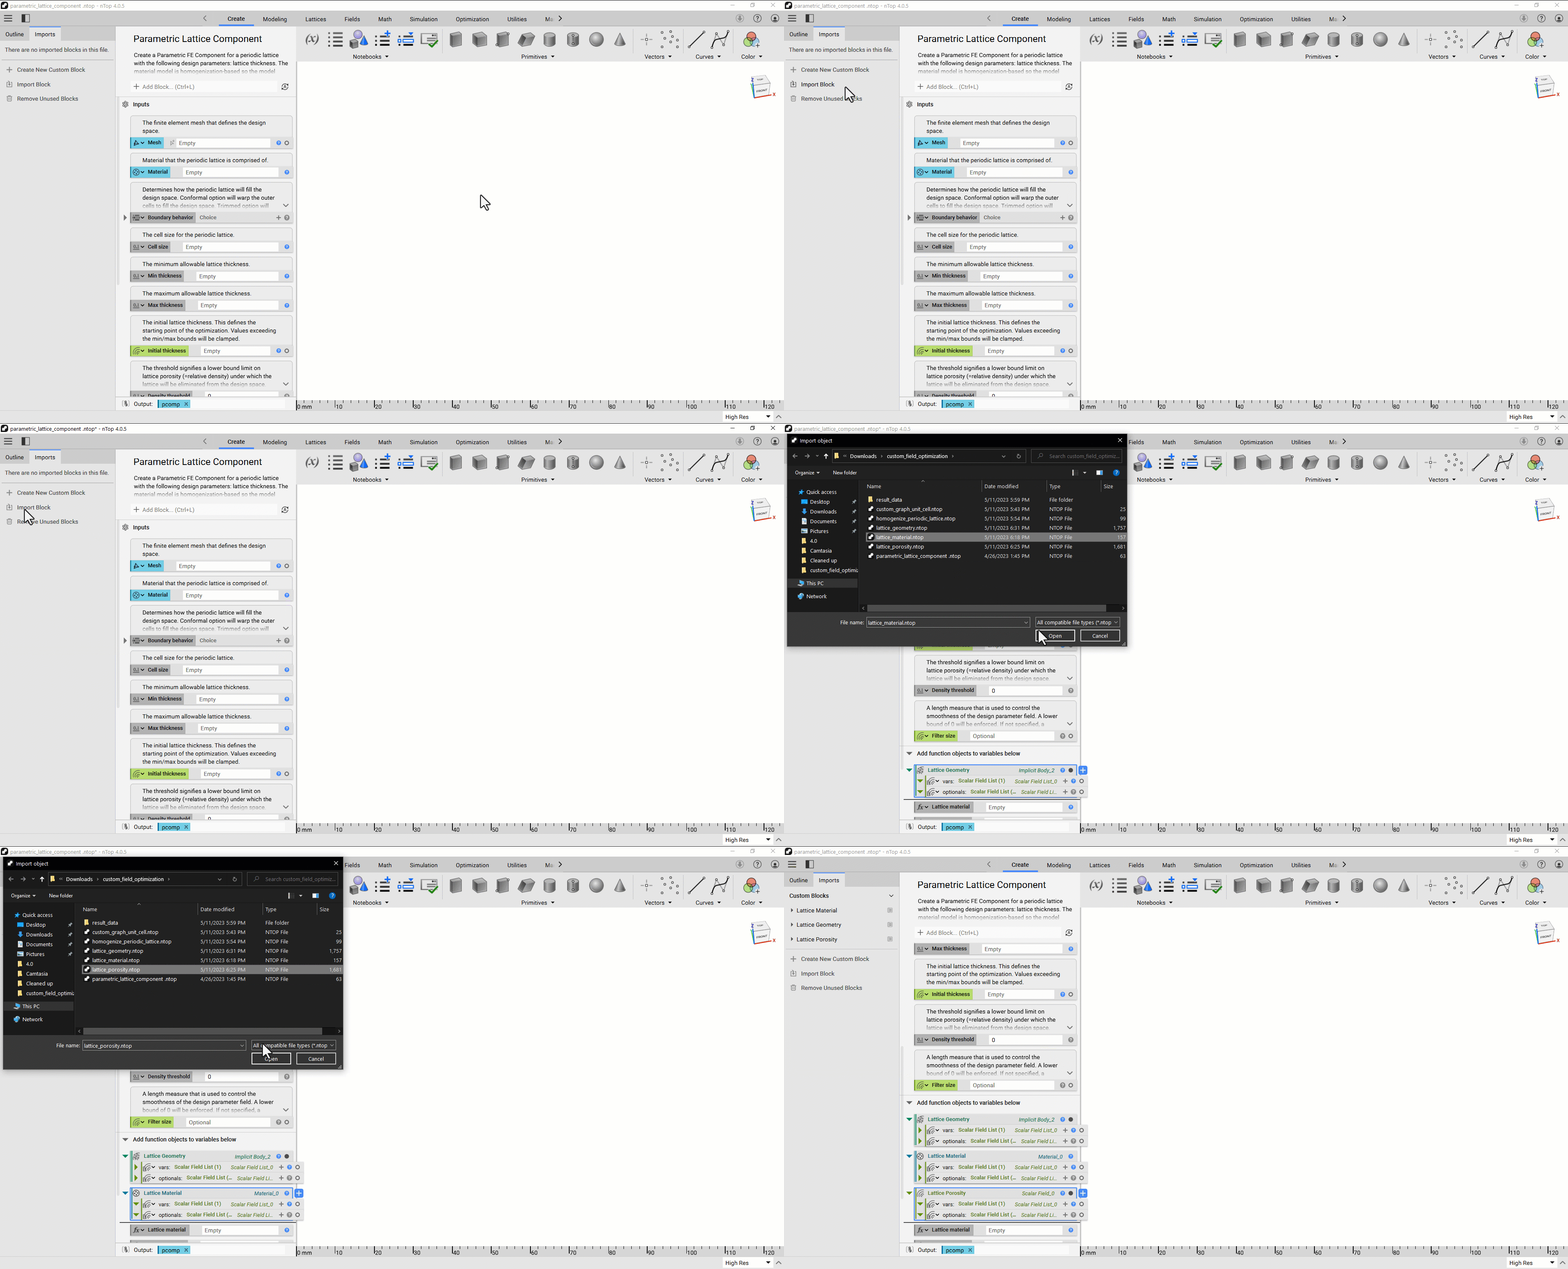
1. Open “parametric_lattice_component.ntop”
2. Import the following from the previous sections using the Import Block option from the Imports tab on the Left bar.
- lattice_geometry.ntop
- lattice_porosity.ntop
- lattice_material.ntop
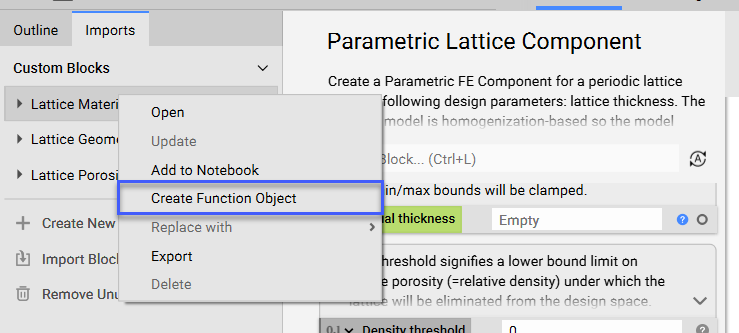
3. Right-click on each of the imported blocks and click “Create Function Object”
4. In the notebook, drag each newly created function object into its respective variable and Delete three imported blocks from the notebook.
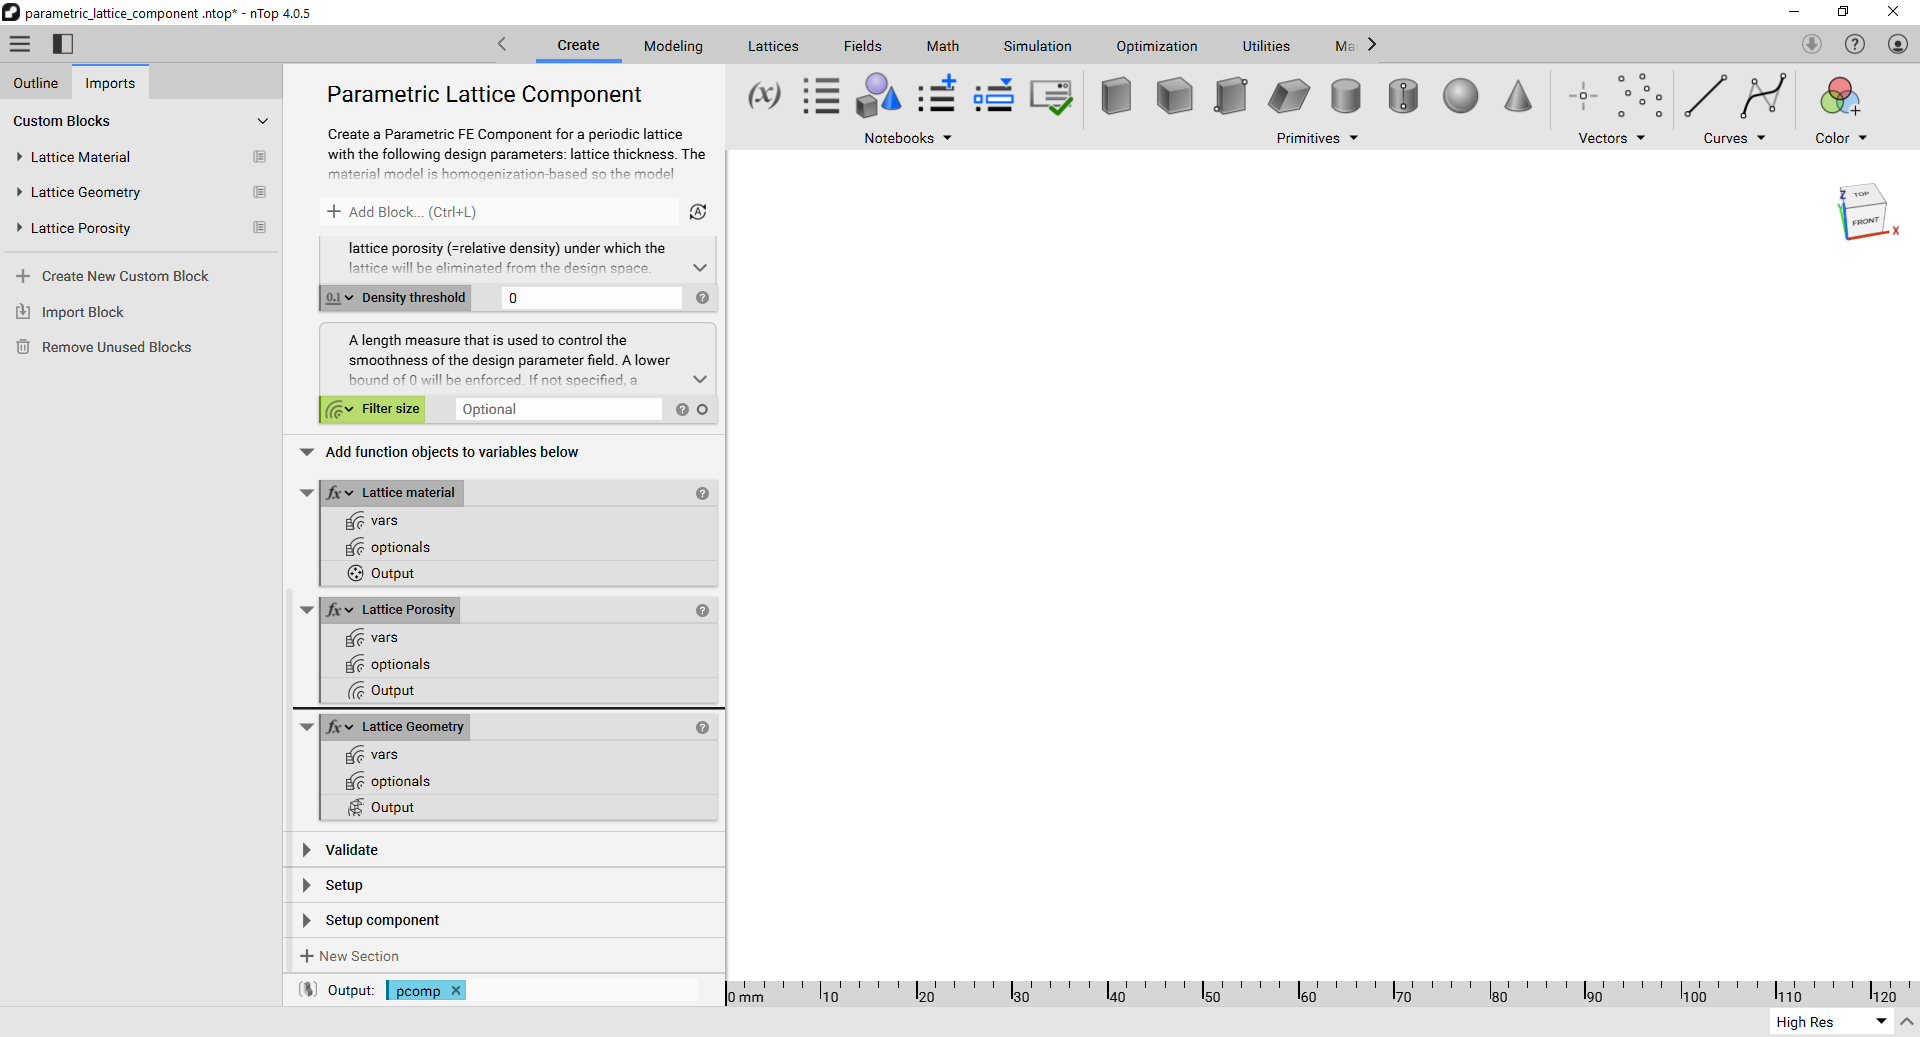
6. Rename the notebook to how you would like to refer to this custom graph component in Field Optimization workflows Ex. “Parametric FCC Component”
7. Save the file as “my_parametric_component.ntop ”
4. How to Use Custom Parametric Lattice Component
You can now import “my_parametric_component.ntop” into any ntop file and use it as a parametric component in Field Optimization, similar to the Parametric Lattice Component block.
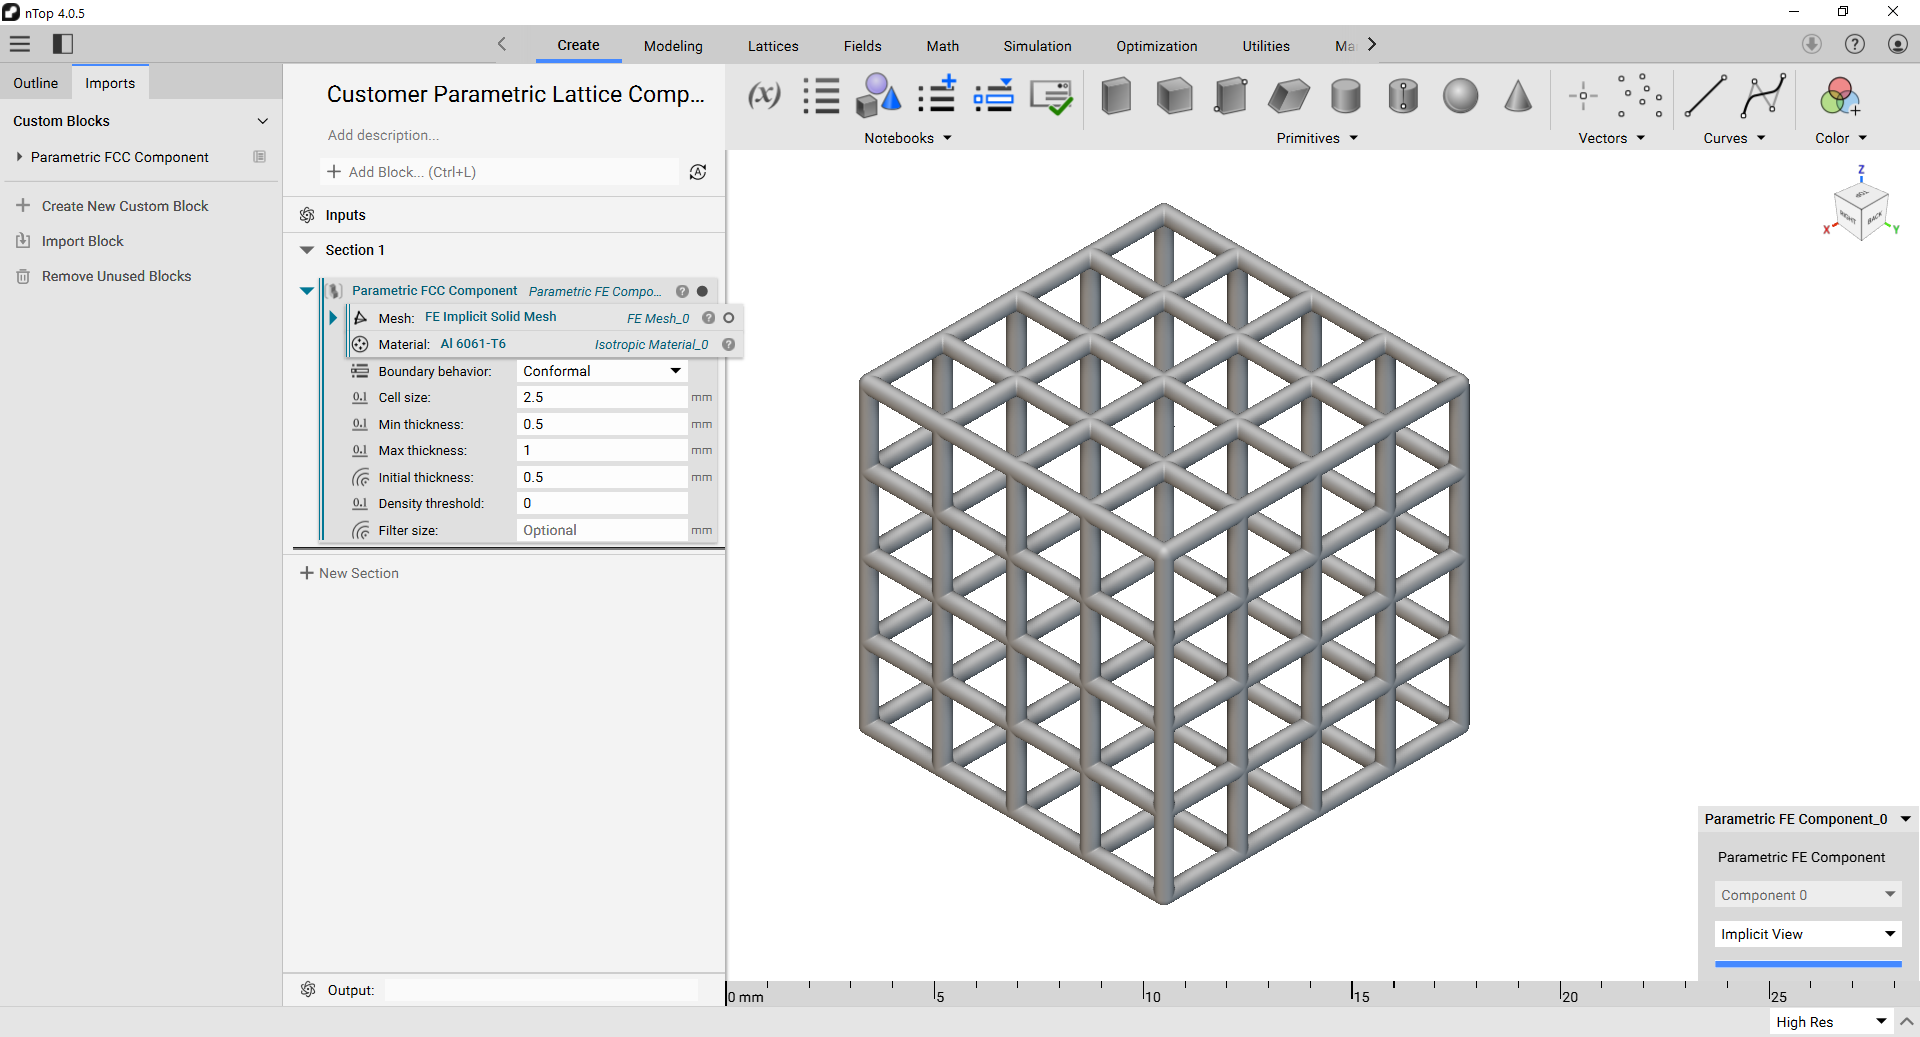
Note: The accuracy of the results will depend on the number of data points and the range of data used during the DOE/Parameter sweep. Example files for field optimization are available in the “How to Run a Field Optimization” support article. As well as in the nTop documentation (available through Learn More).
Are you still having issues? Contact the support team, and we’ll be happy to help!
Example Files