Introduction
nTop Connect is a concept and framework designed to support plugin development within the nTop environment. It provides a robust platform for partners and customers to create specialized toolkits, known as nTop Connectors, that extend the functionality of nTop. These Connectors enable seamless integration with external tools for tasks such as analysis, meshing, and manufacturing directly within nTop.
How does a Connector work?
nTop includes an internal Toolkit interface to load sets of custom blocks and specialized native blocks for specific purposes (e.g., Lightweighting, Applied Materials, Additive Manufacturing). nTop Connect builds upon this existing Toolkit interface, enabling nTop partners to develop their own toolkits for tighter integration with nTop.
Partners can develop their Connector, which, once installed, appears as a toolkit block or blocks within nTop. These toolkit blocks are designed to be integrated into customer workflows, allowing them to run partner software seamlessly through the Run Command block.
Key components of nTop Connector?
- Connector Installer (.msi): It is strongly recommended that the Connector be packaged as an MSI installer. This allows seamless file copying, registry management, setting environment variables, and adding the toolkit to nTop. The MSI installer ensures that all necessary components are correctly installed and configured.
- Connector Blocks (.ntop): Connectors operate as Blocks within nTop workflows. Therefore, the custom blocks associated with the Connector must be included in the MSI installer. These blocks integrate with nTop, enabling users to incorporate the Connector's functionality into their workflows.
- Partner Executable (.exe): Connectors often require external software applications to execute tasks. These applications need to be executables (.exe) so they can be launched by the Run Command block within nTop. Typically, these executables are distributed as part of the Connector installer. If the application is already pre-installed, the Connector can be configured to locate the existing installation and update the path during installation.
- Toolkit Configuration File (.json): The Connector installer must include a toolkit configuration file in JSON format. This file is essential for nTop to load the Connector after installation and restart. It ensures that nTop recognizes and integrates the Connector into its environment.
Compose the connector notebooks (.ntop)
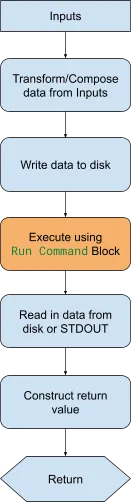
The functional blocks comprising the functionality of your Connector are nTop notebooks. The flowchart above shows a typical notebook workflow. Our workflow is built around the `Run Command` block, which provides a mechanism to launch a process and run a command-line-based utility. While this is not mandatory, you can develop functionality entirely within the nTop block ecosystem. Most partners will interface with an executable they have written using this block.
The only requirements for your notebook:
- You must define an output (return) value.
- The notebook's title defines the name appearing in the nTop block library once the connector is loaded.
-
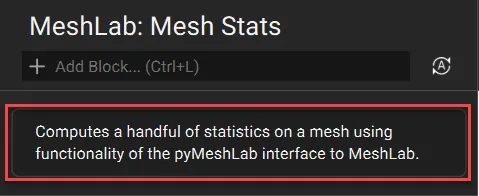
We strongly recommend specifying the notebook's description field, as this will provide the end user with additional context for using your connector's functionality. The image below shows the notebook description for the toolkit block.
Useful blocks
Any block or custom block available in nTop may be used to develop your Connector. Several new blocks will dramatically ease the development process: Get Environment Variable, Await, Temporary Directory, and Remove Temporary Directory. When combined with serialization-to-file blocks, ex. Export Mesh, you can create a seamless export-import process.
Get Environment Variable
One mechanism to communicate Connector-specific configuration with nTop is to use environment variables. A Connector’s installer can set these and then read them using the Get Environment Variable block. If the variable is critical to the connector's function, set the Required input.
The Rerun input should contain the variable that, upon completion, will kickstart the run of the Get Environment Variable block.
Temporary Directory / Remove Temporary Directory
This creates a directory on disk that can be used to group exported files together. By default, it will put the directory in the current user’s temporary directory, like:
C:/Users/[UserID]/AppData/Local/Temp/nTopology/Working/726ede8f-4c44-4146-9a6a-d1690995fc60
This is useful as it will be dynamically set when the notebook file is moved to a different machine.
Await
The Await block can be useful for ensuring that files are written to disk before executing the next function, such as from the Export Mesh block.
Function-Or
The Function-Or block is a beta feature designed to help connector developers handle optional inputs more flexibly. It allows you to define a function that will be applied when an optional input is present. If the input is provided, the function processes it and returns the result. If not, the block simply returns a specified default value. This enables more robust strategies for managing optional data within connector blocks.
Develop the executable (.exe)
When the Run Command Block runs, it executes command-line instructions to run an external partner software application. This partner application can be delivered in one of the following ways:
-
Pre-installed Application:
If the partner application is installed and offers sufficient command-line capabilities, the Run Command Block can invoke it directly. In this case, the Connector installer only needs to distribute the relevant nTop files (e.g., Custom Blocks) and the Toolkit configuration (.json) file. The installer should verify and resolve the path to the pre-installed executable during setup.
- Packaged Desktop Application: The partner application can be bundled with the Connector installer and distributed to users. It is recommended that partners implement proper license management to allow customers to try the application before making a purchase. This ensures a smooth user experience while maintaining control over software licensing.
- Command-line Client for Cloud Services: A command-line client must be included with the Connector installer if the Connector is designed to interact with cloud-based services or APIs. The client facilitates communication between nTop and the web application. Authentication can be managed through a graphical user interface (GUI) dialog, command-line prompts for entering user credentials (ID and password), or an API key for seamless cloud access.
Package the Connector as an MSI
Packaging and installation of the connector is left to the partner’s preference. We recommend packaging within an MSI for Windows systems for easier organization and use.
Only a folder of files with the appropriate structure needs to be moved into the connectors folder for the Connector to be picked up by nTop. The folder should be given a unique name and contain the following:
- connector.json : file that defines the metadata and structure of the connector.
- icons folder : folder that contains SVG icon files.
- blocks folder : folder that contains the nTop notebooks that define the connector.
Icon Guidelines
- Graphic
- 46x46 pixels with 4px padding
- Aligned to the pixel grid
- Use 1px weight for standard lines and borders
- Never use text, only visual iconography
- Colors
-
Each icon has a light mode and a dark mode version
- the dark ribbon color is #333333, RGB (51,51,51)
- the light mode ribbon color is #F2F2F2, RGB (242,242,242)
-
- Export as SVG
- With a transparent background
- File Name:
- Ensure there are no special characters
- Include an underscore between each word (mesh_from_implicit_body)
- If an icon is for light theme, append _light (mesh_from_implicit_body_light)
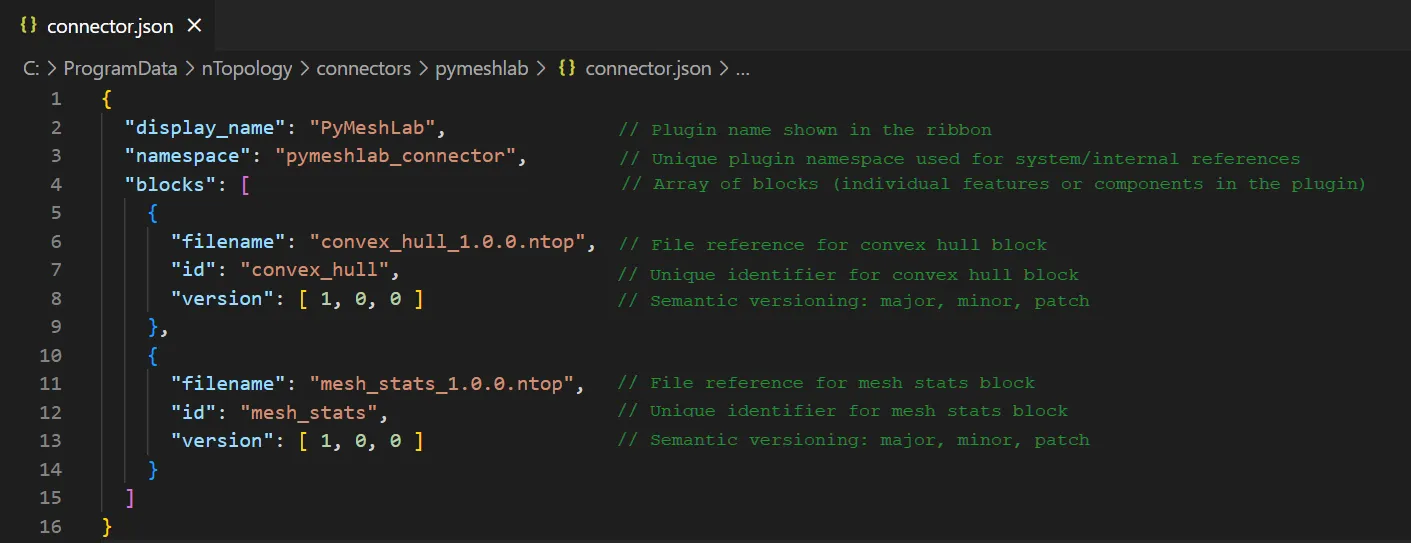
Connector.json Definition
The connector.json file connects the toolkit blocks to nTop so they can appear and operate in nTop as regular blocks. This file contains lines of code for the following information:
- Plugin information
- “display_name”
- “namespace”
- Contained blocks
- “blocks”
- “filename”
- “id”
- Versioning and deprecation
- “version”
- “deprecated”
- Documentation
- “docs”
Example: PyMeshLab Connector
The example below demonstrates how to create and enable an nTop connector. In this example, we will be using a connector called PyMeshLab. This connector contains two different blocks that serve two separate functions. We will break down the construction of one of the blocks, as well as the other components of the connector. To download the files and get started, use this provided link:
Building a connector nTop file
This section explains how to build one of the toolkit blocks to work with your .exe file. As mentioned above, this section will explain how to incorporate some of the new connector blocks.
Mesh Stats block
This block’s function starts with an input mesh. This mesh is exported from nTop and then works with the mesh_stats.exe to generate the table. The table of mesh values is then reimported back into nTop.
 |
The input mesh for your workflow. |
 |
Allows you to group inputs of different types if you have multiple inputs. |
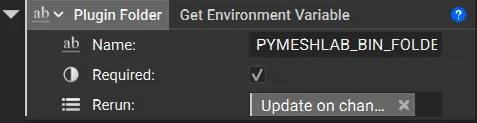 |
Reads the environment variable established by the Connector's installer. The binaries are still discoverable if the installation is to a non-standard folder. |
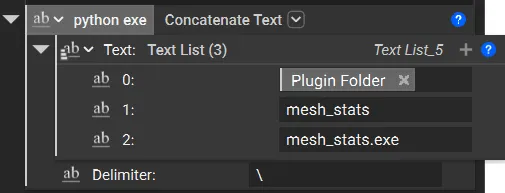 |
Establish the path to the Python binary using the environment variable referenced earlier. |
 |
Create a directory in the temp folder where the work mesh can be exported, worked with, and reimported. |
| Variable created from the path property chip of the Temporary Directory. | |
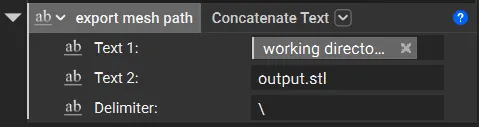 |
Creates a file path for the Export Mesh block. |
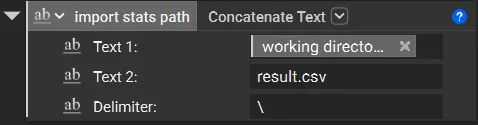 |
Creates a file path for importing the statistics table. |
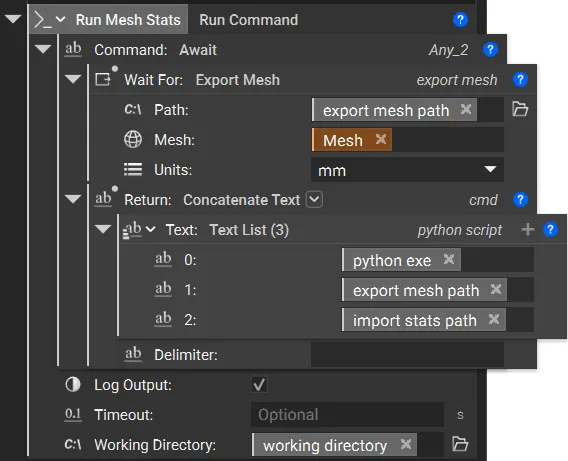 |
The Run Command block is used to run the Python script. Before running the script, we have an Await block to make sure the functions are performed in the correct order. Once the mesh is exported, the block runs the script using our previously established paths. By setting the working directory to the temporary folder, we can reference the filenames of the export/reimport mesh files. This allows us to avoid redefining the full path of the reimport JSON dictionary for the Import Mesh block. |
 |
Waits for the script to run and receive the exit code before importing the mesh stats from the temporary directory. |
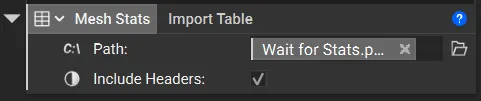 |
Imports the CSV file that contains the mesh stats. |
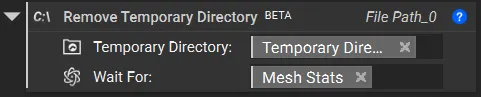 |
Removes the temporary directory after the mesh stats have been successfully imported. |
| The output of this block is the mesh statistics. |
Building the connector.json file
The image below shows the contents of the connector.json file for the pymeshlab connector. The comments on the right side explain each line of code’s function.
Additional JSON Options:
These are some strings you can add to your JSON file for additional capabilities that aren’t used in this example.
Deprecated Blocks: If you need to use a deprecated version of a block in your toolkit, you can use this string to enable the deprecated version instead of the current one. Make sure to replace “block name” with your block’s name and the “X” with the correct version number and date values.
"deprecated": {
        "message": "block name version X.X.X is now deprecated and removed from the system due to an external library update. Please update the block to the latest version.",
        "date": "XX/XX/XXXX"
} // deprecated is used for a deprecated block
Block Documentation: If you would like to add a “Learn More” link for your block, you will need to create an HTML file of the information. The HTML file should be placed inside a new folder that can be named “docs”. The folder path should be:
C:\ProgramData\nTopology\connectors\connector name\docs
The string below is used to link nTop to the HTML file.

"docs": {
        "block id”: “docs/block id.html”
} // references block documentation for learn more link
Setting up folder structure
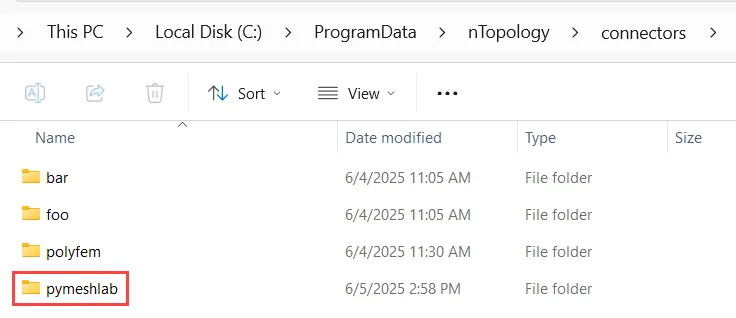
1. Open your file explorer and navigate to the following folder:
C:\ProgramData\nTopology\
2. Create a new folder named connectors
3. In the connectors folder, create a new folder and name it your connector name. For this example, we have created a new folder named pymeshlab
4. Create a new folder in your connector folder and name it blocks. Then move your connector block ntop files to this folder.
5. Create a new folder in your connector folder and name it icons. Then move your SVG icon files to this folder.
6. Transfer your connector.json file into the pymeshlab folder; it should now look like this:

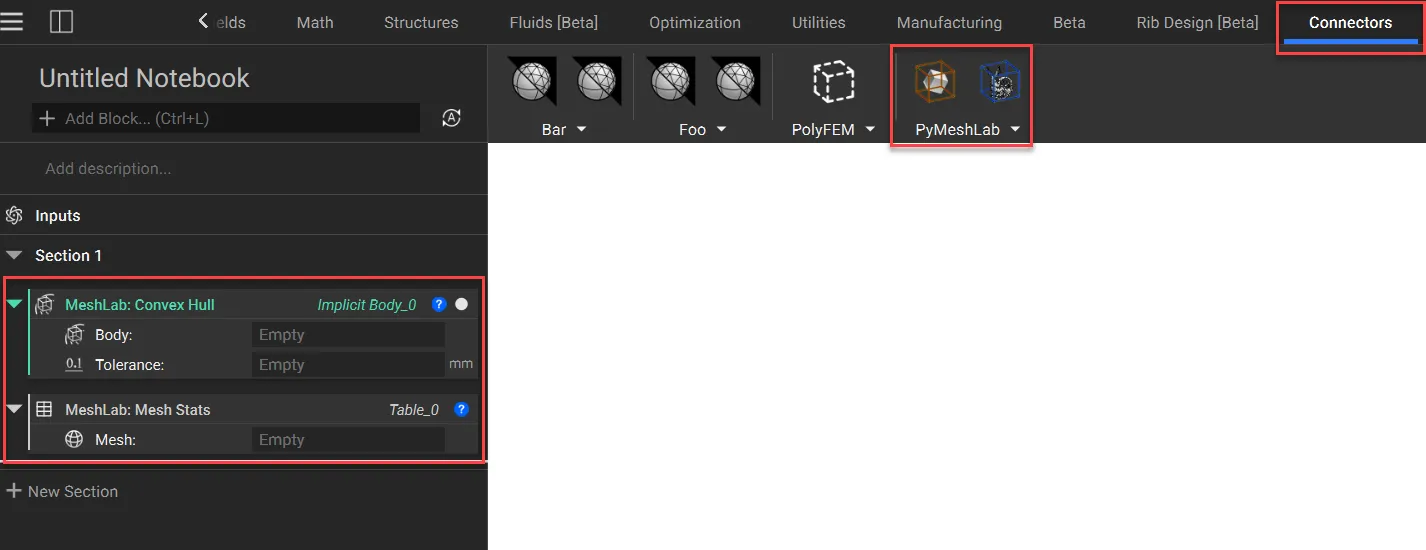
7. If you set up your connector correctly, your new toolkit blocks should be under the Connectors tab of the nTop platform.